Instruction Videos for BAUM 1620 PFF
The videos below cover the 1620 PFF model only. For videos on other models, visit our full videos page.
Initial Setup
Baum1620PFF Control Console
Baum1620PFF Setup Fold Plate
Baum1620PFF Open Close Fold Plate
Baum1620PFF Setup Slitter Shafts
Baum1620PFF Setup Cross Carrier Side Guides
Baum 1620PFF Setup Jobs
Daily Operation
Baum1620PFF Loading Feeder
Baum1620PFF Setup Batch Count
Maintenance
Baum1620PFF Double Sheet Detector
Baum1620PFF How to wire pump
Baum1620PFF Maintenance Screen
Instruction Videos for BAUM 714 XAP
The videos below cover the 714 XAP model only. For videos on other models, visit our full videos page.
Baum 714XAP Basic Operations
Baumfolder 714XAP Autofold Tabletop Folder Overview
BAUM 714 XLT
The videos below cover the 714 XLT model only. For videos on other models, visit our full videos page.
Baum 714XLT
Baum 714XLT Tabletop Folder 2nd Station 8page Folder
Fold Plate Settings for Most Common Folds
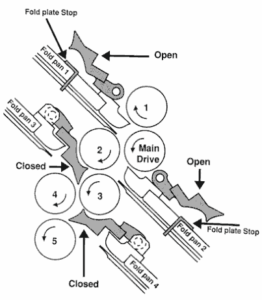
 Foldplates
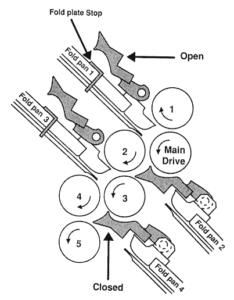
#1 Open – Set Paperstop to 1/3 unfolded sheet length
#2 Closed
#3 Open – Set Paperstop to 1/3 unfolded sheet length
#4 Closed
Baumset Paper Thickness Settings
#1 = 1 Thickness
#2 = 1 Thickness
#3 = 1 Thickness
#4 = 3 Thicknesses
#5 = 3 Thicknesses
 Foldplates
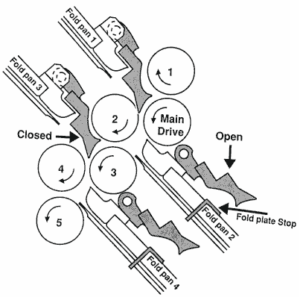
#1 Closed
#2 Open – Set Paperstop to 1/3 unfolded sheet length
#3 Closed
#4 Open – Set Paperstop to 1/3 unfolded sheet length
Baumset Paper Thickness Settings
#1 = 1 Thickness
#2 = 1 Thickness
#3 = 1 Thickness
#4 = 1 Thicknesses
#5 = 3 Thicknesses
 Foldplates
#1 Open – Set Paperstop to 2/3 unfolded sheet length
#2 Open – Set Paperstop to 1/3 unfolded sheet length
#3 Closed
#4 Closed
Baumset Paper Thickness Settings
#1 = 1 Thickness
#2 = 1 Thickness
#3 = 3 Thickness
#4 = 3Thicknesses
#5 = 3 Thicknesses
Below you will find the most popular folds. The illustration and legend below shows how to interpret the diagrams you will see in the detailed examples.
Instructions:
1. Refer to the diagram below. Visualize the sheet lying flat on the register table with the top end marked “HEAD GUIDE” towards the fold rollers. The paper edge (on the left) under the register guide is labelled “SIDE GUIDE”.
 |
Each numbered Imposition Block in this manual contains:
|
2. Dashed lines represent folds. Page numbers or letters without circles are face up. Page numbers or letters with circles are on the underside of the sheet. When letters are used, folds are to be made “A” to “A”….”B” to “B”…etc.
3. In order to use your Baumfolder Imposition Manual properly, note that the plates in each folding section are numbered conventionally as follows:
| Parallel Folder: | No. 1 (Up) | 2nd Rollaway | No. 1 (Up) | |
| No. 2 (Down) | (16-Page) Folder | No. 2 (Down) | ||
| No. 3 (Up) | No. 3 (Up) | |||
| No. 4 (Down) | No. 4 (Down) | |||
| 1st Rollaway | No. 1 (Up) | 3rd Rollaway | No. 1 (Up) | |
| ( 8-Page ) Folder: | No. 2 (Down) | (32-Page) Folder: | No. 2 (Down) | |
| No. 4 (Down) | ||||
Notes:
- When planning an imposition, check your folded layout for proper page numbers and correct guide edges. Verify that your folder is large enough to do the job, that is, that the fold plate depths are sufficient for the folds desired.
- If the desired imposition is unusual, try the stock on the folder before printing (make a trial folding run).
- Use the most logical layout and avoid unnecessary problems such as air pockets and adverse paper grain.
- For better results, use scores when possible.
- There are alternate ways of making many of these imposition; those shown are in common use to achieve the results shown. An experienced operator will often develop alternate methods to achieve the same results.
- Baumfolder Corporation does not assume responsibility for any errors that might inadvertently be contained in this guide. Please recheck your layouts and verify the result.
In-line & In-plate Gluing: Gluer Guide
In-Plate Glue Systems…
 Glue is applied to the paper while it is in the fold plate. (See figure 1) The glue head(s) are mounted on the paper stop in the fold plate. This system is used almost specifically for spot gluing. Self-mailers requiring spot gluing can be produced using common letter folds and half folds. This system will have a lower initial cost since the fold plates only need grooves. A groove is necessary for the glue to pass through without being wiped off. Grooved fold rollers are normally not needed since the glue does not contact them.
In-Line Glue Systems…
 Glue is applied at the register table as the papers flows “in line” to the fold rollers. The glue head(s) are mounted onto a tie bar just before the fold rollers. (See figure 2) You can use an in-line glue system for spot-gluing self-mailers and line-gluing booklets, side seams, etc. These systems require grooves in the fold rollers and the fold plates that accept exposed glue. Some modifications to the sheet guide on the register table may also be needed if a line of glue is required within one inch or less from the left edge of the sheet.
Standard fold rollers can be removed to have grooves machined where needed, then be reinstalled. If multiple groove locations are required, segmented fold rollers should be installed.
The segmented fold roller consists of a shaft with numerous roller segments that have individual set screws. It gives the most flexibility to the operator, and the groove can be closed when not in use. This type of glue system gives the most application capabilities, but also costs more.
Selection of the proper glue is important. You should consult the gluing system manufacturer about the proper viscosity of glue. Using the wrong glue can cause clogged lines, heads and improper displacement. This booklet does not cover remoistenable glue, due to the special equipment required.
The two most common classifications of glue used with folders are commonly called “Cold Glue” and “Hot-Melt Glue”. Both cold and hot-melt glues can be obtained as “Fugitive” and “Permanent” formulations.
“Cold-Glue” refers to liquid glue used at room temperature. There are many types of cold glue, including “permanent” and “fugitive”. Cold glue does not require preheating. It is sold as a liquid and has a limited shelf life.
“Hot-Melt Glue” is used when the application calls for removable glue, when an immediated bond is critical for coated or heavy stocks that tend to spring open after folding, or when there is concern about fiber tear of the printed piece. The gluing system heats the glue and provides a pump to pressurize the glue lines. The set-up time is longer than with cold glue since it takes about 20 minutes or more to heat the glue. (Heating times vary) Hot-Melt is used for longer runs and is quite cost-effective as an alternative to tabbing mail pieces. Hot-melt systems tend to be more expensive than cold-glue systems. The shelf life of hot-melt glue is longer than cold glue since it is not a liquid and is cooled and reheated during every use.
“Permanent” glue is used for a variety of applications that require a permanent bond including 8-page booklets, pockets, and perforated tear-offs on billing statements. Permanent glue is not resealable after the piece is opened.
“Fugitive” glue is used when the bond is intended to be temporary so that the piece can be easily reopened by the recipient. Self-mailers are one example of fugitive glue usage, which eliminates tabbing and inserting operations. Fugitive glue is not resealable after the piece is opened.
 Contact gluing heads apply the glue when the paper comes in contact with the glue tip at the bottom of the glue head, similar to a spring-loaded ball-point pen. (See figure 3) Glue is fed by gravity through a hose to the glue head. It looks a lot like a hospital IV setup. Care must be used to keep the tips clean, especially with a gravity-fed system.
 Non-Contact gluing heads apply glue when an electronic signal triggers dispersal of a predetermined amount of glue as the paper passes beneath the heads. (See figure 4) The heads do not come in contact with the paper. The glue is under constant pressure in the line(s) with compressed air, and the glue reservoir can be placed on the floor. The glue head(s) are normally provided with a purge valve for testing or removing glue, A non-contact head with a pressurized gluing system needs less maintenance than the gravity-fed systems.
 Grooved Nose refers to the leading edge of the upper portion of the fold plate where the paper enters. (See figure 5) This curved area must have a groove for every spot or line of applied glue that is exposed when entering or exiting the fold plate. The nose of the plate must be grooved from the top of the curve, around to and including the straight area. The groove depth must be a minimum of .075 inches deep x .50 inches wide. A .09 inch deep x .50 inch wide groove is recommended for hot-melt gluing. Making the groove the same width as the open area between your fold plate ribs give maximum flexibility to do a wider variety of jobs. Grooving of the nose is more critical on fold plates made of stamped sheet metal. You must be careful not to make the groove too deep, creating a weak area in the plate. Most of these fold plates are 1/8 inch thick. Also take care not to leave a sharp edge or burrs when machining the groove. A nick or burr can cause the paper to stumble when entering the fold plate and/or cause dog ears on the sheet. Do not cut through the plate. Fold plates that are a “bolt-up” construction have more material thickness to be grooved.
 Segmented/Grooved Fold Rollers All in-line gluing systems require certain fold rollers to be grooved to allow exposed glue to pass through without contacting the fold roller and smearing. All fold rollers on your folding machine do not require a groove. You must define the job you want to run in terms of which fold plates are being used to determine which roller(s) require grooves. The location of the groove in the fold roller must be aligned with a groove in the nose of the fold plate to allow sufficient clearance for the glue to pass through without smearing.
You can provide the required grooves by removing the existing roller and machining a groove, or you can replace the existing fold roller with a segmented roller. Grooving an existing fold roller required positioning all your gluing jobs to this fixed groove location. The minimum groove depth in the roller should be .09 inches or approx. 3/32 of an inch. The minimum groove width should be .31 inches or 5/16 on an inch.
A segmented fold roller gives you the flexibility to apply glue in more locations. A segmented fold roller consists of a shaft with several moveable segments using setscrews for positioning. (See figure 6) These segmented fold rollers are available from Baumfolder for most Baum floor-model folding machines.
Before adding a gluing system to a new or existing floor-model folder you should consider the following questions:
1. What are your gluing applications?
This will define whether you need an in-plate or in-line gluing system. Will you need spot-gluing only or will you need line-gluing for side seams and/or booklet production? Your first venture into gluing might be to produce self-mailers only. You should plan ahead for future jobs, or even look at existing jobs that could be done at a reduced cost using a glue system (booklets, lottery tickets, etc.) If you are unsure of your future needs, consider a system that provides for additional glue heads and program changes. Refer to the common gluing application impositions and configurations in section 8 for additional information on types of systems and modifications required for the folder.
2. What types of glue will be required?
Will there be applications for fugitive and/or permanent glue? Will cold glue or hot-melt glue be used? The choice of glue can be based on production volume and the type of printed material to be bonded. The amount of fiber tear when reopening the piece should be evaluated. Hot-melt fugitive glue will provide a very clean and even removable glue when reopening the piece. Cold glue systems will work well for most production runs. A long-term commitment for millions of self-mailers would indicate a hot-melt system is needed.
3. Do you have compressed air?
If you have in-house compressed air, you can easily adapt a pressurized glue system with non-contact glue heads. If you do not have compressed air, you are limited to a gravity-fed system or you can add a small commercial air compressor from your local hardware store. The air compressor from your folding machine will not provide enough pressure and was designed to work with the folder only.
4. What maintenance is required for the glue system?
A gravity-fed glue system will require more cleaning maintenance than a pressurized system. Purging of glue lines is also easier on a pressurized system. Most glue systems will require dabbing grease on the glue head tip between usage. A glue head with a self-closing device over the tip to remove excess glue is good, but is also expensive. Cold fugitive glues are the easiest to clean up with a rag moistened with warm water..
5. What modifications are needed to my folder?
Once you have determined the gluing applications you will perform on your folder, you need to consider what grooves are required for the fold plates and fold rollers, if necessary. You must also consider the mounting of the glue system components. It is imperative that you have a source determined for grooving your fold plate nose and fold rollers. See the next section for folder modifications needed for your gluing applications. Contact your authorized Baumfolder dealer for more assistance.
When reviewing in-line vs. in-plate systems, keep in mind both gluing systems require modifications to the existing floor-model folder. The common item needed for both systems is grooved fold plate noses. When selecting a gluing system, consider the following:
| Application | In-Line | In-Plate |
|---|---|---|
| 8-page booklets | Yes | No |
| 12-page booklets | Yes | No |
| 16-page booklets | Yes | No |
| Pockets | Yes | No |
| Self-mailers, 1/2 fold (spot glue only) |
Yes | Yes |
| Self-mailers, 1/2 fold (spot & line glue) |
Yes | No |
| Self-mailers, letter fold (spot glue only) |
Yes | Yes |
| Self-mailers, letter fold (spot & line glue) |
Yes | No |
View the Imposition Handbook for our 18 Most Popular Fold Examples.
- Tip: Fugitive glues can fool you when you are folding and gluing on the folder. If you try to open a completed piece immediately when it exits the folder, you will find that the piece will open easily. You will wonder if the bond is strong enough. Check pieces that have been setting for approximately three minutes to test the bond. You can assist the assurance of a good bond by setting the #5 Baumset to have a little more tension than normal.
- Tip: Note that cold glues have a limited shelf life. Do not order more glue than you will need Old glue will cause performance problems. Glue can be ordered in small containers at very reasonable prices.
- Tip: You can double your production of 8-1/2 in. x 11 in. self-mailers by printing them two-up on 11 in. x 17 in. paper. Fold & glue then slit into two streams as they exit the folder. Your glue system would need the capability to add additional gluing heads.
- Tip: When a job calls for using perforated tear-offs and/or spot gluing, it is helpful to the recipients if opening instructions are printed on the piece.
- Tip: When selecting your gluing system, investigate a system that provides a glue tank that is sized to accept the standard containers of glue supplied by the glue manufacturer without having to pour the glue into the glue tank. Being able to insert the manufacturer’s bottle into the tank allows you to quickly change glues with minimal clean-up maintenance.
- Tip: Where two glue lines are placed close together (for example, two-up work) the glue lines should use the same, but wider, roller groove. Each edge of the groove should be 5/32 inch from the center of the glue line. Note: A segmented fold roll is recommended for this type of application.